Defining your device
A device profile can be thought of as a template or as a type or classification of device. General characteristics about the type of device, the data theses devices provide, and how to command them is all provided in a device profile. Other pages within this document set provide more details about a device profile and its purpose (see core metadata to start). It is typical that as part of the reference information setup sequence, the device service provides the device profiles for the types of devices it manages.
Device Profile
See core metadata API for more details.
Our fictitious device service will manage only the human/dog counting
camera, so it only needs to make one POST request to create the
monitoring camera device profile. Since device profiles are often
represented in YAML, you make a multi-part form-data POST with the device
profile file below to create the Camera Monitor profile.
Each profile has a unique name along with a description, manufacturer, model and collection of labels to assist in queries for particular profiles. These are relatively straightforward attributes of a profile.
Understanding Commands
The device profile defines how to communicate with any device that
abides by the profile. In particular, it defines the deviceResources, deviceCommands and coreCommands used to send requests to the device (via the device service). See the Device Profile documentation for more background on each of these.
coreCommands specify the commands which are available via the core command micro service, for reading and writing to the device. coreCommands are named and have either a get (for retrieving data from the device) or put (to send data to the device) or both. Each command can have a single get and
single put. Both get and put are optional, but it would not make sense
to have a command without at least one get or at least one put. The
command name must be unique for that profile (the coreCommand name does not
have to be unique across all of EdgeX - for example, many profiles may
contain a "status" coreCommand).
Understanding Get Command
The get and put each have a path which is used by EdgeX to call on the
specific command get or put at the URL address provided for the service.
Hypothetically, if the address to a device service was
<http://abc:9999> and the get command had a path of foo, then
internally, EdgeX would know to use <http://abc:9999/foo> to call on
the get Command.
gets and puts have response objects (or an array of response objects).
A get must have at least one response object. A put is not required to
have a response. Responses might be "good" or "error" responses.
Each get should have at least one "good" response, but it may have
several error responses depending on what problems or issues the device
service may need to reply with. Each response is made up of a code
(which suggests if it is a good or error response), a description (human
readable information about what is in the response), and an array of
expected values. For practical purposes, the code is usually an HTTP
status code like 200 (for good responses), 404 or 503 (examples of bad
responses).
The expected values in a response are an array of deviceResource or deviceCommand
names. Per the walkthrough profile, if a call to an get command is expected to return back the human
and dog count data, then the response's expected values would be the deviceResources
["HumanCount","CanineCount"]. When the actual call to the device service
is made, the body of the return response from the service is expected to
return a value for each of the expected values in a map where the deviceResource names are used as keys. Again, using the human and dog counts
as an example, if the expected values were [HumanCount, CanineCount]
then the body of a good response from the service would contain a map
that looks something like this:
{
    "HumanCount": 5,
    "CanineCount": 2
}
Here is an example set of responses that might be used for a get command
in the camera example. Note that one response is coded as the "good"
response (code 200) while the other is for "error" response (code
404). The expected values for the good response are the Value Descriptor
names for the camera's count data. The expected values for the
"error" response is the Value Descriptor name for an error message.
{
  "responses":[
    {"description" : "Get the people and dog counts","expectedValues" : ["HumanCount", "CanineCount"],"code" : "200"},
    {"description" : "bad request","expectedValues" : ["CameraError"],"code" : "404"}
  ]
}
Understanding Set Command Parameters
coreCommands are also used to send data to devices (via device services) as much
as they are used to get data from devices. Therefore, any coreCommand may
have a set of parameters associated with its call. Parameter data is
added to the body of the command request. Parameters are defined via an
array of parameterNames on a command.
Here again, this array is just an array of deviceResource names. Each
deviceResource defines the name and type of information to be supplied
as a parameter to the command call. For example, if a command had a
parameterNames array of [ScanDepth, SnapshotDuration], then the receiving command
is expecting values that match these deviceResources.
Similar to the way expected values are used to set the keys of the
response body, the parameter names are used as keys in a map to pass
parameter values in a command call that has parameters. Here might be
what is populated in the body of the command call when the
parameterNames are [ScanDepth, SnapshotDuration].
{
  "ScanDepth": 1,
  "SnapshotDuration": 10
}
If you open the Camera Monitor Profile YAML file, see that there are commands to get people and dog
counts (and a command called Counts, which provides both values). There
are also commands to get and put the snapshot duration and scan depth.
Walkthrough - Device Profile
Use either the Postman or Curl tab below to walkthrough uploading the device profile.
Download the Device Profile
Click on the link below to download and save the device profile (YAML) to your system.
EdgeX_CameraMonitorProfile.yml
Note
Device profiles are stored in core metadata. Therefore, note that the calls in the walkthrough are to the metadata service, which defaults to port 48081.
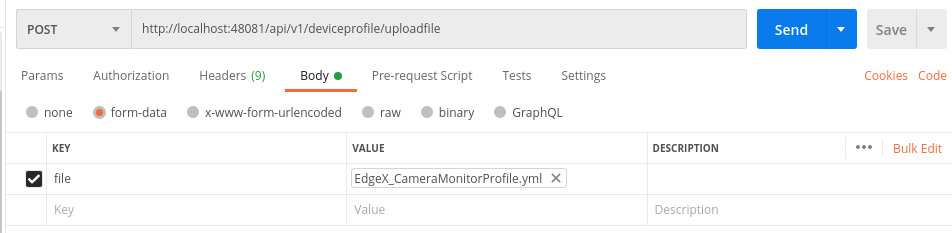
Upload the Device Profile to EdgeX
Make a POST request to http://localhost:48081/api/v1/deviceprofile/uploadfile. The request should not include any additional headers (leave the defaults). In the Body, make sure "form-data" is selected and set the Key to file and then select the device profile file where you saved it (as shown below).
If your API call is successful, you will get a generated ID (a UUID) for your new DeviceProfile in the response area.
Make a curl POST request as shown below.
curl -F 'file=@/path/to/your/profile/here/EdgeX_CameraMonitorProfile.yml' localhost:48081/api/v1/deviceprofile/uploadfile
If your API call is successful, you will get a generated ID (a UUID) for your new DeviceProfile.
Warning
Note that the file location in the curl command above needs to be replaced with your actual file location path. Also, if you do not save the device profile file to EdgeX_CameraMonitorProfile.yml, then you will need to replace the file name as well.
Test the GET API
If you make a GET call to the http://localhost:48081/api/v1/deviceprofile URL (with Postman or curl) you will get a listing (in JSON) of all the device profiles (and all of its associated deviceResource, deviceCommand and coreCommand) currently defined
in your instance of EdgeX, including the one you just added.