MQTT
EdgeX - Jakarta Release
Overview
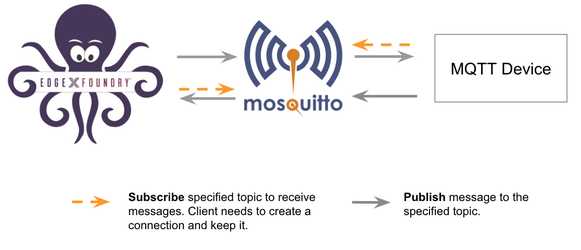
In this example, we use a script to simulate a custom-defined MQTT device, instead of a real device. This provides a straight-forward way to test the device-mqtt features using an MQTT-broker.
Note
Multi-Level Topics move metadata (i.e. device name, command name,... etc) from the payload into the MQTT topics. Notice the sections marked with Using Multi-level Topic: for relevant input/output throughout this example.
Prepare the Custom Device Configuration
In this section, we create folders that contain files required for deployment of a customized device configuration to work with the existing device service:
- custom-config
  |- devices
     |- my.custom.device.config.toml
  |- profiles
     |- my.custom.device.profile.yml
Device Configuration
Use this configuration file to define devices and schedule jobs. device-mqtt generates a relative instance on start-up.
Create the device configuration file, named my.custom.device.config.toml, as shown below:
# Pre-define Devices
[[DeviceList]]
  Name = "my-custom-device"
  ProfileName = "my-custom-device-profile"
  Description = "MQTT device is created for test purpose"
  Labels = [ "MQTT", "test" ]
  [DeviceList.Protocols]
    [DeviceList.Protocols.mqtt]
       # Comment out/remove below to use multi-level topics
       CommandTopic = "CommandTopic"
       # Uncomment below to use multi-level topics
       # CommandTopic = "command/my-custom-device"
    [[DeviceList.AutoEvents]]
       Interval = "30s"
       OnChange = false
       SourceName = "message"
Note
CommandTopic is used to publish the GET or SET command request
Device Profile
The DeviceProfile defines the device's values and operation method, which can be Read or Write.
Create a device profile, named my.custom.device.profile.yml, with the
following content:
name: "my-custom-device-profile"
manufacturer: "iot"
model: "MQTT-DEVICE"
description: "Test device profile"
labels:
  - "mqtt"
  - "test"
deviceResources:
  -
    name: randnum
    isHidden: true
    description: "device random number"
    properties:
      valueType: "Float32"
      readWrite: "R"
  -
    name: ping
    isHidden: true
    description: "device awake"
    properties:
      valueType: "String"
      readWrite: "R"
  -
    name: message
    isHidden: false
    description: "device message"
    properties:
      valueType: "String"
      readWrite: "RW"
  -
    name: json
    isHidden: false
    description: "JSON message"
    properties:
      valueType: "Object"
      readWrite: "RW"
      mediaType: "application/json"

deviceCommands:
  -
    name: values
    readWrite: "R"
    isHidden: false
    resourceOperations:
        - { deviceResource: "randnum" }
        - { deviceResource: "ping" }
        - { deviceResource: "message" }
Prepare docker-compose file
- Clone edgex-compose
!!! note Use main branch until jakarta is released.
$ git clone git@github.com:edgexfoundry/edgex-compose.git $ git checkout main - Generate the docker-compose.yml file (notice this includes mqtt-broker)
$ cd edgex-compose/compose-builder $ make gen ds-mqtt mqtt-broker no-secty ui - Check the generated file
$ ls | grep 'docker-compose.yml'
docker-compose.yml
Mount the custom-config
Open the edgex-compose/compose-builder/docker-compose.yml file and then add volumes path and environment as shown below:
 # docker-compose.yml

 device-mqtt:
    ...
    environment:
      DEVICE_DEVICESDIR: /custom-config/devices
      DEVICE_PROFILESDIR: /custom-config/profiles
      ...
    volumes:
    - /path/to/custom-config:/custom-config
    ...
Note
Replace the /path/to/custom-config in the example with the correct path
Enabling Multi-Level Topics
To use the optional setting for MQTT device services with multi-level topics, make the following changes in the device service configuration files:
-
There are two ways to set the environment variables for multi-level topics.
-
If the code is built with compose builder, modify the docker-compose.yml file in edgex-compose/compose-builder:
# docker-compose.yml device-mqtt: ... environment: MQTTBROKERINFO_INCOMINGTOPIC: "incoming/data/#" MQTTBROKERINFO_RESPONSETOPIC: "command/response/#" MQTTBROKERINFO_USETOPICLEVELS: "true" ... -
Otherwise if the device service is built locally, modify these lines in
configuration.toml:# Comment out/remove when using multi-level topics #IncomingTopic = "DataTopic" #ResponseTopic = "ResponseTopic" #UseTopicLevels = false # Uncomment to use multi-level topics IncomingTopic = "incoming/data/#" ResponseTopic = "command/response/#" UseTopicLevels = trueNote
If you have previously run Device MQTT locally, you will need to remove the services configuration from Consul. This can be done with:
curl --request DELETE http://localhost:8500/v1/kv/edgex/devices/2.0/device-mqtt?recurse=true
-
-
In
my.custom.device.config.toml:[DeviceList.Protocols] [DeviceList.Protocols.mqtt] # Comment out/remove below to use multi-level topics # CommandTopic = "CommandTopic" # Uncomment below to use multi-level topics CommandTopic = "command/my-custom-device"Note
If you have run Device-MQTT before, you will need to delete the previously registered device(s) by replacing
in the command below: curl --request DELETE http://localhost:59881/api/v2/device/name/<device-name>where<device-name>can be found by running:curl --request GET http://localhost:59881/api/v2/device/all | json_pp
Start EdgeX Foundry on Docker
Deploy EdgeX using the following commands:
$ cd edgex-compose/compose-builder
$ docker-compose pull
$ docker-compose up -d
Using a MQTT Device Simulator
Overview
Expected Behaviors
Using the detailed script below as a simulator, there are three behaviors:
-
Publish random number data every 15 seconds.
Default (single-level) Topic: The simulator publishes the data to the MQTT broker with topic
DataTopicand the message is similar to the following:Using Multi-level Topic: The simulator publishes the data to the MQTT broker with topic{"name":"my-custom-device", "cmd":"randnum", "method":"get", "randnum":4161.3549}incoming/data/my-custom-device/randnumand the message is similar to the following:{"randnum":4161.3549} -
Receive the reading request, then return the response.
Default (single-level) Topic:
- The simulator receives the request from the MQTT broker, the topic is
CommandTopicand the message is similar to the following:{"cmd":"randnum", "method":"get", "uuid":"293d7a00-66e1-4374-ace0-07520103c95f"} - The simulator returns the response to the MQTT broker, the topic is
ResponseTopicand the message is similar to the following:{"cmd":"randnum", "method":"get", "uuid":"293d7a00-66e1-4374-ace0-07520103c95f", "randnum":42.0}
Using Multi-level Topic:
-
The simulator receives the request from the MQTT broker, the topic is
command/my-custom-device/randnum/get/293d7a00-66e1-4374-ace0-07520103c95fand message returned is similar to the following:{"randnum":"42.0"} -
The simulator returns the response to the MQTT broker, the topic is
command/response/#and the message is similar to the following:{"randnum":"4.20e+01"}
- The simulator receives the request from the MQTT broker, the topic is
-
Receive the set request, then change the device value.
Default (single-level) Topic:
-
The simulator receives the request from the MQTT broker, the topic is
CommandTopicand the message is similar to the following:{"cmd":"message", "method":"set", "uuid":"293d7a00-66e1-4374-ace0-07520103c95f", "message":"test message..."} -
The simulator changes the device value and returns the response to the MQTT broker, the topic is
ResponseTopicand the message is similar to the following:{"cmd":"message", "method":"set", "uuid":"293d7a00-66e1-4374-ace0-07520103c95f"}
Using Multi-level Topic:
-
The simulator receives the request from the MQTT broker, the topic is
command/my-custom-device/testmessage/set/293d7a00-66e1-4374-ace0-07520103c95fand the message is similar to the following:{"message":"test message..."} -
The simulator changes the device value and returns the response to the MQTT broker, the topic is
command/response/#and the message is similar to the following:{"message":"test message..."}
-
Creating and Running a MQTT Device Simulator
To implement the simulated custom-defined MQTT device, create a javascript, named mock-device.js, with the following content:
Default (single-level) Topic:
function getRandomFloat(min, max) {
    return Math.random() * (max - min) + min;
}

const deviceName = "my-custom-device";
let message = "test-message";
let json = {"name" : "My JSON"};

// DataSender sends async value to MQTT broker every 15 seconds
schedule('*/15 * * * * *', ()=>{
    let body = {
        "name": deviceName,
        "cmd": "randnum",
        "randnum": getRandomFloat(25,29).toFixed(1)
    };
    publish( 'DataTopic', JSON.stringify(body));
});

// CommandHandler receives commands and sends response to MQTT broker
// 1. Receive the reading request, then return the response
// 2. Receive the set request, then change the device value
subscribe( "CommandTopic" , (topic, val) => {
    var data = val;
    if (data.method == "set") {
        switch(data.cmd) {
            case "message":
                message = data[data.cmd];
              break;
            case "json":
                json = data[data.cmd];
                break;
        }
    }else{
        switch(data.cmd) {
            case "ping":
              data.ping = "pong";
              break;
            case "message":
              data.message = message;
              break;
            case "randnum":
                data.randnum = 12.123;
                break;
            case "json":
                data.json = json;
                break;
          }
    }
    publish( "ResponseTopic", JSON.stringify(data));
});
Using Multi-level Topic:
function getRandomFloat(min, max) {
    return Math.random() * (max - min) + min;
}

const deviceName = "my-custom-device";
let message = "test-message";
let json = {"name" : "My JSON"};

// DataSender sends async value to MQTT broker every 15 seconds
schedule('*/15 * * * * *', ()=>{
    let body = getRandomFloat(25,29).toFixed(1);
    publish( 'incoming/data/my-custom-device/randnum', body);
});

// CommandHandler receives commands and sends response to MQTT broker
// 1. Receive the reading request, then return the response
// 2. Receive the set request, then change the device value
subscribe( "command/my-custom-device/#" , (topic, val) => {
    const words = topic.split('/');
    var cmd = words[2];
    var method = words[3];
    var uuid = words[4];
    var response = {};
    var data = val;

    if (method == "set") {
        switch(cmd) {
            case "message":
                message = data[cmd];
                break;
            case "json":
                json = data[cmd];
                break;
        }
    }else{
        switch(cmd) {
            case "ping":
                response.ping = "pong";
                break;
            case "message":
                response.message = message;
                break;
            case "randnum":
                response.randnum = 12.123;
                break;
            case "json":
                response.json = json;
                break;
        }
    }
    var sendTopic ="command/response/"+ uuid;
    publish( sendTopic, JSON.stringify(response));
});
$ mv mock-device.js /path/to/mqtt-scripts
$ docker run -d --restart=always --name=mqtt-scripts \
    -v /path/to/mqtt-scripts:/scripts  \
    dersimn/mqtt-scripts --url mqtt://172.17.0.1 --dir /scripts
Note
Replace the /path/to/mqtt-scripts in the example mv command with the correct path
Execute Commands
Now we're ready to run some commands.
Find Executable Commands
Use the following query to find executable commands:
$ curl http://localhost:59882/api/v2/device/all | json_pp

{
   "deviceCoreCommands" : [
      {
         "profileName" : "my-custom-device-profile",
         "coreCommands" : [
            {
               "name" : "values",
               "get" : true,
               "path" : "/api/v2/device/name/my-custom-device/values",
               "url" : "http://edgex-core-command:59882",
               "parameters" : [
                  {
                     "resourceName" : "randnum",
                     "valueType" : "Float32"
                  },
                  {
                     "resourceName" : "ping",
                     "valueType" : "String"
                  },
                  {
                     "valueType" : "String",
                     "resourceName" : "message"
                  }
               ]
            },
            {
               "url" : "http://edgex-core-command:59882",
               "parameters" : [
                  {
                     "resourceName" : "message",
                     "valueType" : "String"
                  }
               ],
               "name" : "message",
               "get" : true,
               "path" : "/api/v2/device/name/my-custom-device/message",
               "set" : true
            },
            {
                "name": "json",
                "get": true,
                "set": true,
                "path": "/api/v2/device/name/MQTT-test-device/json",
                "url" : "http://edgex-core-command:59882",
                "parameters": [
                    {
                        "resourceName": "json",
                        "valueType": "Object"
                    }
                ]
            }
         ],
         "deviceName" : "my-custom-device"
      }
   ],
   "apiVersion" : "v2",
   "statusCode" : 200
}
Execute SET Command
Execute a SET command according to the url and parameterNames, replacing [host] with the server IP when running the SET command.
$ curl http://localhost:59882/api/v2/device/name/my-custom-device/message \
    -H "Content-Type:application/json" -X PUT  \
    -d '{"message":"Hello!"}'
Execute GET Command
Execute a GET command as follows:
$ curl http://localhost:59882/api/v2/device/name/my-custom-device/message | json_pp

{
   "event" : {
      "origin" : 1624417689920618131,
      "readings" : [
         {
            "resourceName" : "message",
            "binaryValue" : null,
            "profileName" : "my-custom-device-profile",
            "deviceName" : "my-custom-device",
            "id" : "a3bb78c5-e76f-49a2-ad9d-b220a86c3e36",
            "value" : "Hello!",
            "valueType" : "String",
            "origin" : 1624417689920615828,
            "mediaType" : ""
         }
      ],
      "sourceName" : "message",
      "deviceName" : "my-custom-device",
      "apiVersion" : "v2",
      "profileName" : "my-custom-device-profile",
      "id" : "e0b29735-8b39-44d1-8f68-4d7252e14cc7"
   },
   "apiVersion" : "v2",
   "statusCode" : 200
}
Schedule Job
The schedule job is defined in the [[DeviceList.AutoEvents]] section of the device configuration file:
    [[DeviceList.AutoEvents]]
       Interval = "30s"
       OnChange = false
       SourceName = "message"
After the service starts, query core-data's reading API. The results show that the service auto-executes the command every 30 secs, as shown below:
$ curl http://localhost:59880/api/v2/reading/resourceName/message | json_pp

{
   "statusCode" : 200,
   "readings" : [
      {
         "value" : "test-message",
         "id" : "e91b8ca6-c5c4-4509-bb61-bd4b09fe835c",
         "mediaType" : "",
         "binaryValue" : null,
         "resourceName" : "message",
         "origin" : 1624418361324331392,
         "profileName" : "my-custom-device-profile",
         "deviceName" : "my-custom-device",
         "valueType" : "String"
      },
      {
         "mediaType" : "",
         "binaryValue" : null,
         "resourceName" : "message",
         "value" : "test-message",
         "id" : "1da58cb7-2bf4-47f0-bbb8-9519797149a2",
         "deviceName" : "my-custom-device",
         "valueType" : "String",
         "profileName" : "my-custom-device-profile",
         "origin" : 1624418330822988843
      },
      ...
   ],
   "apiVersion" : "v2"
}
Async Device Reading
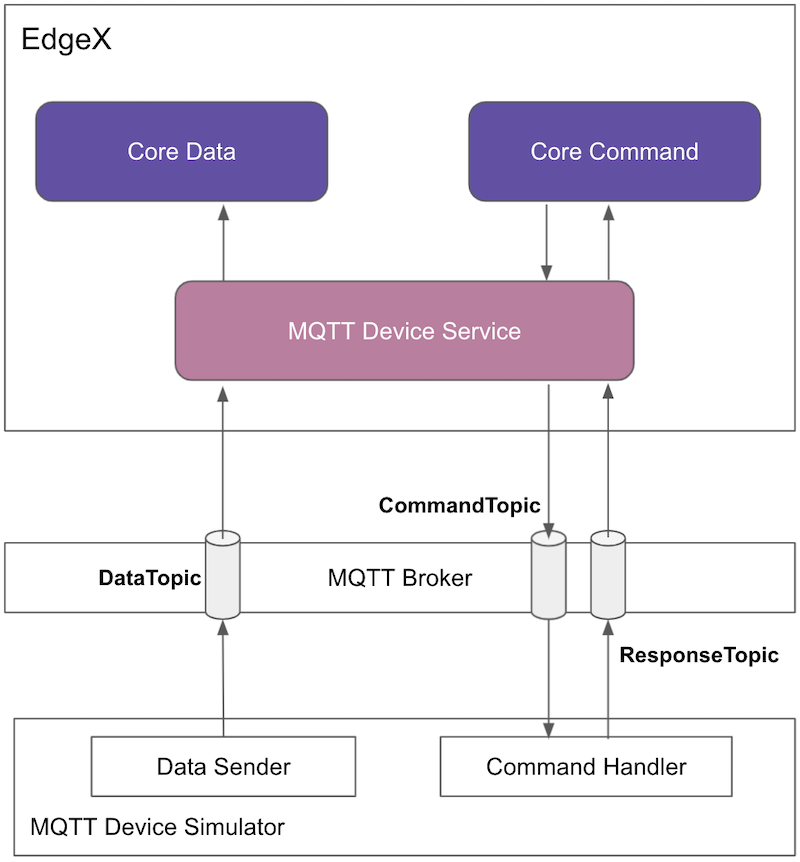
The device-mqtt subscribes to a DataTopic, which waits for the real device to send value to MQTT broker, then device-mqttparses the value and forward to the northbound.
The data format contains the following values:
- name = device name
- cmd = deviceResource name
- method = get or set
- cmd = device reading
The following results show that the mock device sent the reading every 15 secs:
$ curl http://localhost:59880/api/v2/reading/resourceName/randnum | json_pp

{
"readings" : [
{
"origin" : 1624418475007110946,
"valueType" : "Float32",
"deviceName" : "my-custom-device",
"id" : "9b3d337e-8a8a-4a6c-8018-b4908b57abb8",
"binaryValue" : null,
"resourceName" : "randnum",
"profileName" : "my-custom-device-profile",
"mediaType" : "",
"value" : "2.630000e+01"
},
{
"deviceName" : "my-custom-device",
"valueType" : "Float32",
"id" : "06918cbb-ada0-4752-8877-0ef8488620f6",
"origin" : 1624418460007833720,
"mediaType" : "",
"profileName" : "my-custom-device-profile",
"value" : "2.570000e+01",
"resourceName" : "randnum",
"binaryValue" : null
},
...
],
"statusCode" : 200,
"apiVersion" : "v2"
}
MQTT Device Service Configuration
MQTT Device Service has the following configurations to implement the MQTT protocol.
| Configuration | Default Value | Description |
|---|---|---|
| MQTTBrokerInfo.Schema | tcp | The URL schema |
| MQTTBrokerInfo.Host | 0.0.0.0 | The URL host |
| MQTTBrokerInfo.Port | 1883 | The URL port |
| MQTTBrokerInfo.Qos | 0 | Quality of Service 0 (At most once), 1 (At least once) or 2 (Exactly once) |
| MQTTBrokerInfo.KeepAlive | 3600 | Seconds between client ping when no active data flowing to avoid client being disconnected. Must be greater then 2 |
| MQTTBrokerInfo.ClientId | device-mqtt | ClientId to connect to the broker with |
| MQTTBrokerInfo.CredentialsRetryTime | 120 | The retry times to get the credential |
| MQTTBrokerInfo.CredentialsRetryWait | 1 | The wait time(seconds) when retry to get the credential |
| MQTTBrokerInfo.ConnEstablishingRetry | 10 | The retry times to establish the MQTT connection |
| MQTTBrokerInfo.ConnRetryWaitTime | 5 | The wait time(seconds) when retry to establish the MQTT connection |
| MQTTBrokerInfo.AuthMode | none | Indicates what to use when connecting to the broker. Must be one of "none" , "usernamepassword" |
| MQTTBrokerInfo.CredentialsPath | credentials | Name of the path in secret provider to retrieve your secrets. Must be non-blank. |
| MQTTBrokerInfo.IncomingTopic | DataTopic (incoming/data/#) | IncomingTopic is used to receive the async value |
| MQTTBrokerInfo.ResponseTopic | ResponseTopic (command/response/#) | ResponseTopic is used to receive the command response from the device |
| MQTTBrokerInfo.UseTopicLevels | false (true) | Boolean setting to use multi-level topics |
| MQTTBrokerInfo.Writable.ResponseFetchInterval | 500 | ResponseFetchInterval specifies the retry interval(milliseconds) to fetch the command response from the MQTT broker |
Note
Using Multi-level Topic: Remember to change the defaults in parentheses in the table above.
Overriding with Environment Variables
The user can override any of the above configurations using environment: variables to meet their requirement, for example:
# docker-compose.yml

device-mqtt:
  . . .
  environment:
    MQTTBROKERINFO_CLIENTID: "my-device-mqtt"
    MQTTBROKERINFO_CONNRETRYWAITTIME: "10"
    MQTTBROKERINFO_USETOPICLEVELS: "false"
    ...