How To Add an MQTT Device
Overview
In this example, we use a script to simulate a custom-defined MQTT device, instead of a real device. This provides a straight-forward way to test the device-mqtt features using an MQTT-broker.
Note
Multi-Level Topics move metadata (i.e. device name, command name,... etc) from the payload into the MQTT topics. Notice the sections marked with Using Multi-level Topic: for relevant input/output throughout this example.
Prepare the Custom Device Configuration
In this section, we create folders that contain files required for deployment of a customized device configuration to work with the existing device service:
- custom-config
  |- devices
     |- my.custom.device.config.yaml
  |- profiles
     |- my.custom.device.profile.yml
Device Configuration
Use this configuration file to define devices and schedule jobs. device-mqtt generates a relative instance on start-up.
Create the device configuration file, named my.custom.device.config.yaml, as shown below:
# Pre-define Devices
deviceList:
- name: "my-custom-device"
  profileName: "my-custom-device-profile"
  description: "MQTT device is created for test purpose"
  labels: [ "MQTT", "test" ]
  protocols:
    mqtt:
      CommandTopic: "command/my-custom-device"
  autoEvents:
    - interval: "30s"
      onChange: false
      sourceName: "message"
Note
CommandTopic is used to publish the GET or SET command request
Device Profile
The DeviceProfile defines the device's values and operation method, which can be Read or Write.
Create a device profile, named my.custom.device.profile.yml, with the
following content:
name: "my-custom-device-profile"
manufacturer: "iot"
model: "MQTT-DEVICE"
description: "Test device profile"
labels:
  - "mqtt"
  - "test"
deviceResources:
  -
    name: randnum
    isHidden: true
    description: "device random number"
    properties:
      valueType: "Float32"
      readWrite: "R"
  -
    name: ping
    isHidden: true
    description: "device awake"
    properties:
      valueType: "String"
      readWrite: "R"
  -
    name: message
    isHidden: false
    description: "device message"
    properties:
      valueType: "String"
      readWrite: "RW"
  -
    name: json
    isHidden: false
    description: "JSON message"
    properties:
      valueType: "Object"
      readWrite: "RW"
      mediaType: "application/json"

deviceCommands:
  -
    name: values
    readWrite: "R"
    isHidden: false
    resourceOperations:
        - { deviceResource: "randnum" }
        - { deviceResource: "ping" }
        - { deviceResource: "message" }
Prepare the docker-compose file
-
Clone edgex-compose ``` $ git clone git@github.com:edgexfoundry/edgex-compose.git $ cd edgex-compose $ git checkout v3.1
Note
Using the main branch is not recommended as it will contain the latest work in progress changes, which is not guaranteed to be stable or working. Use the latest stable release tag instead.
-
Generate the docker-compose.yml file (notice this includes mqtt-broker)
$ cd compose-builder $ make gen ds-mqtt mqtt-broker no-secty ui - Check the generated file
$ ls | grep 'docker-compose.yml'
docker-compose.yml
Mount the custom-config
Create a docker-compose file docker-compose.override.yml to extend the compose file which generated by the compose-builder. In this file, we add volume path and environment variables as shown below:
 # docker-compose.override.yml

 version: '3.7'

 services:
     device-mqtt:
        environment:
          DEVICE_DEVICESDIR: /custom-config/devices
          DEVICE_PROFILESDIR: /custom-config/profiles
        volumes:
        - /path/to/custom-config:/custom-config
Note
Replace the /path/to/custom-config in the example with the correct path
Start EdgeX Foundry using Docker
Deploy EdgeX using the following commands:
$ cd edgex-compose/compose-builder
$ docker compose pull
$ docker compose -f docker-compose.yml -f docker-compose.override.yml up -d
Using an MQTT Device Simulator
Overview
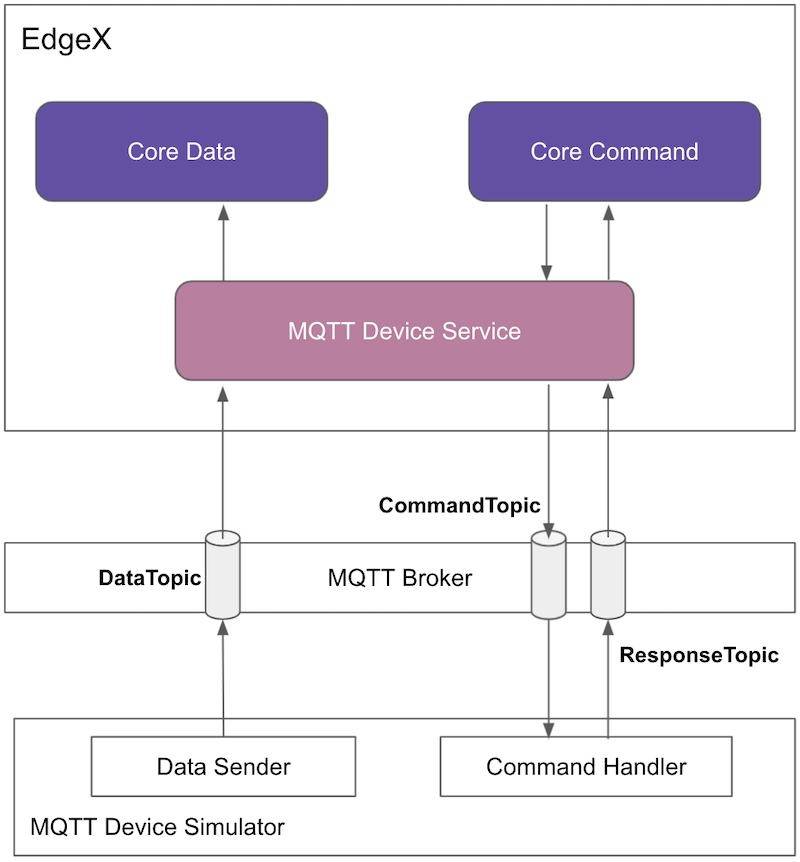
Expected Behaviors
Using the detailed script below as a simulator, there are three behaviors:
- Publish random number data every 15 seconds.
The simulator publishes the data to the MQTT broker with topic incoming/data/my-custom-device/values and the message is similar to the following:
{
  "randnum" : 4161.3549,
  "ping"    : "pong",
  "message" : "Hello World"
}
-
Receive the reading request, then return the response.
-
The simulator receives the request from the MQTT broker, the topic is
command/my-custom-device/randnum/get/293d7a00-66e1-4374-ace0-07520103c95fand message returned is similar to the following:{"randnum":"42.0"} -
The simulator returns the response to the MQTT broker, the topic is
command/response/#and the message is similar to the following:{"randnum":"4.20e+01"}
-
-
Receive the set request, then change the device value.
-
The simulator receives the request from the MQTT broker, the topic is
command/my-custom-device/testmessage/set/293d7a00-66e1-4374-ace0-07520103c95fand the message is similar to the following:{"message":"test message..."} -
The simulator changes the device value and returns the response to the MQTT broker, the topic is
command/response/#and the message is similar to the following:{"message":"test message..."}
-
Creating and Running a MQTT Device Simulator
To implement the simulated custom-defined MQTT device, create a javascript, named mock-device.js, with the following content:
function getRandomFloat(min, max) {
    return Math.random() * (max - min) + min;
}

const deviceName = "my-custom-device";
let message = "test-message";
let json = {"name" : "My JSON"};

// DataSender sends async value to MQTT broker every 15 seconds
schedule('*/15 * * * * *', ()=>{
    var data = {};
    data.randnum = getRandomFloat(25,29).toFixed(1);
    data.ping = "pong"
    data.message = "Hello World"

    publish( 'incoming/data/my-custom-device/values', JSON.stringify(data));
});

// CommandHandler receives commands and sends response to MQTT broker
// 1. Receive the reading request, then return the response
// 2. Receive the set request, then change the device value
subscribe( "command/my-custom-device/#" , (topic, val) => {
    const words = topic.split('/');
    var cmd = words[2];
    var method = words[3];
    var uuid = words[4];
    var response = {};
    var data = val;

    if (method == "set") {
        switch(cmd) {
            case "message":
                message = data[cmd];
                break;
            case "json":
                json = data[cmd];
                break;
        }
    }else{
        switch(cmd) {
            case "ping":
                response.ping = "pong";
                break;
            case "message":
                response.message = message;
                break;
            case "randnum":
                response.randnum = 12.123;
                break;
            case "json":
                response.json = json;
                break;
        }
    }
    var sendTopic ="command/response/"+ uuid;
    publish( sendTopic, JSON.stringify(response));
});
$ mv mock-device.js /path/to/mqtt-scripts
$ docker run --rm --name=mqtt-scripts \
    -v /path/to/mqtt-scripts:/scripts  --network host \
    dersimn/mqtt-scripts --dir /scripts
Note
Replace the /path/to/mqtt-scripts in the example mv command with the correct path
Then the mqtt-scripts show logs as below:
2022-08-12 09:52:42.086 <info>  mqtt-scripts 1.2.2 starting
2022-08-12 09:52:42.227 <info>  mqtt connected mqtt://127.0.0.1
2022-08-12 09:52:42.733 <info>  /scripts/mock-device.js loading
Execute Commands
Now we're ready to run some commands.
Find Executable Commands
Use the following query to find executable commands:
$ curl http://localhost:59882/api/v3/device/all | json_pp

{
   "deviceCoreCommands" : [
      {
         "profileName" : "my-custom-device-profile",
         "coreCommands" : [
            {
               "name" : "values",
               "get" : true,
               "path" : "/api/v3/device/name/my-custom-device/values",
               "url" : "http://edgex-core-command:59882",
               "parameters" : [
                  {
                     "resourceName" : "randnum",
                     "valueType" : "Float32"
                  },
                  {
                     "resourceName" : "ping",
                     "valueType" : "String"
                  },
                  {
                     "valueType" : "String",
                     "resourceName" : "message"
                  }
               ]
            },
            {
               "url" : "http://edgex-core-command:59882",
               "parameters" : [
                  {
                     "resourceName" : "message",
                     "valueType" : "String"
                  }
               ],
               "name" : "message",
               "get" : true,
               "path" : "/api/v3/device/name/my-custom-device/message",
               "set" : true
            },
            {
                "name": "json",
                "get": true,
                "set": true,
                "path": "/api/v3/device/name/MQTT-test-device/json",
                "url" : "http://edgex-core-command:59882",
                "parameters": [
                    {
                        "resourceName": "json",
                        "valueType": "Object"
                    }
                ]
            }
         ],
         "deviceName" : "my-custom-device"
      }
   ],
   "apiVersion" : "v2",
   "statusCode" : 200
}
Execute SET Command
Execute a SET command according to the url and parameterNames, replacing [host] with the server IP when running the SET command.
$ curl http://localhost:59882/api/v3/device/name/my-custom-device/message \
    -H "Content-Type:application/json" -X PUT  \
    -d '{"message":"Hello!"}'
Execute GET Command
Execute a GET command as follows:
$ curl http://localhost:59882/api/v3/device/name/my-custom-device/message | json_pp

{
   "apiVersion":"v2",
   "event":{
      "apiVersion":"v2",
      "deviceName":"my-custom-device",
      "id":"13164041-2e6c-4454-9bc3-8e8987e85311",
      "origin":1660298227470009014,
      "profileName":"my-custom-device-profile",
      "readings":[
         {
            "deviceName":"my-custom-device",
            "id":"c58e65b4-62f0-4e41-b368-645993ec0bfd",
            "origin":1660298227470005426,
            "profileName":"my-custom-device-profile",
            "resourceName":"message",
            "value":"Hello!",
            "valueType":"String"
         }
      ],
      "sourceName":"message"
   },
   "statusCode":200
}
Schedule Job
The schedule job is defined in the autoEvents section of the device definition file:
    autoEvents:
       Interval: "30s"
       OnChange: false
       SourceName: "message"
After the service starts, query core-data's reading API. The results show that the service auto-executes the command every 30 secs, as shown below:
$ curl http://localhost:59880/api/v3/reading/resourceName/message | json_pp

{
   "statusCode" : 200,
   "readings" : [
      {
         "value" : "test-message",
         "id" : "e91b8ca6-c5c4-4509-bb61-bd4b09fe835c",
         "resourceName" : "message",
         "origin" : 1624418361324331392,
         "profileName" : "my-custom-device-profile",
         "deviceName" : "my-custom-device",
         "valueType" : "String"
      },
      {
         "resourceName" : "message",
         "value" : "test-message",
         "id" : "1da58cb7-2bf4-47f0-bbb8-9519797149a2",
         "deviceName" : "my-custom-device",
         "valueType" : "String",
         "profileName" : "my-custom-device-profile",
         "origin" : 1624418330822988843
      },
      ...
   ],
   "apiVersion" : "v2"
}
Async Device Reading
The device-mqtt subscribes to a DataTopic, which waits for the real device to send value to MQTT broker, then device-mqttparses the value and forward to the northbound.
The data format contains the following values:
- name = device name
- cmd = deviceResource name
- method = get or set
- cmd = device reading
The following results show that the mock device sent the reading every 15 secs:
$ curl http://localhost:59880/api/v3/reading/resourceName/randnum | json_pp

{
  "readings" : [
    {
        "origin" : 1624418475007110946,
        "valueType" : "Float32",
        "deviceName" : "my-custom-device",
        "id" : "9b3d337e-8a8a-4a6c-8018-b4908b57abb8",
        "resourceName" : "randnum",
        "profileName" : "my-custom-device-profile",
        "value" : "2.630000e+01"
    },
    {
        "deviceName" : "my-custom-device",
        "valueType" : "Float32",
        "id" : "06918cbb-ada0-4752-8877-0ef8488620f6",
        "origin" : 1624418460007833720,
        "profileName" : "my-custom-device-profile",
        "value" : "2.570000e+01",
        "resourceName" : "randnum",
    },
    ...
  ],
"statusCode" : 200,
"apiVersion" : "v2"
}